We’ve all been there: you’ve just unboxed a new cartridge, carefully installed it into your machine, and closed the door, expecting that satisfying hum of a printer ready to work. Instead, you’re greeted by a flashing red light or a stubborn error message saying, "Toner Empty" or "No Cartridge Detected."
The short answer to why your laser printer tells you there is no toner—even when you just installed a new one—is caused by a forgotten piece of protective shipping tape, a dirty electronic chip, or the printer's internal memory being stuck on the previous "empty" status.
Whether you are using an original brand or a high-quality cartridge , the hardware and the software need to have a perfect match to work together. If that connection is interrupted, the printer stays stuck in the past, thinking the old toner cartridge is still there.
This guide will walk you through the physical and digital steps to ensure your cartridge new is recognized instantly.
Why Your Printer Don’t Recognize a New Cartridge
Here are the most common reasons your printer is ignoring your latest installation:
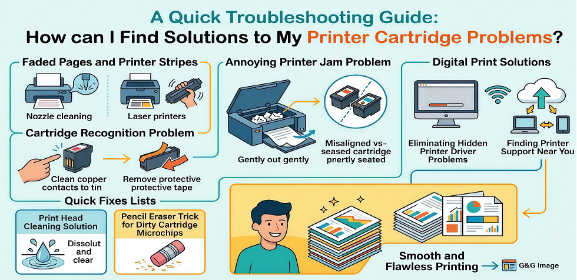
The Protective Gear: Most cartridges come wrapped like precious cargo. Sometimes, a tiny piece of clear plastic or a bright orange shipping clip is left behind, preventing the toner cartridge from making full contact with the printer's sensors.
Dirty Chip Contacts: Every new cartridge has a small copper-colored chip. This is the key that tells the printer: its toner cartridge is full and ready to work. If there’s a fingerprint or a speck of dust on this chip, the printer simply can't "read" the message.
The Firmware Wall: In 2026, printer manufacturers are more protective than ever. Sometimes, a recent automatic software update can cause the machine to be extra picky, leading it to reject even a perfectly good compatible toner cartridge because it doesn't recognize the updated digital "signature."
How to Solve Toner Recognition Issues
Understanding why this happens is half the way. Before we dive into any complicated settings, let’s start with the basics. Follow these quick steps to make sure your toner cartridge is actually ready for action:
Step 1: The Physical Check-Up
Look for the "Orange Bits": Most manufacturers use bright orange or red plastic clips and pull-tabs to protect the cartridge new during shipping. If even one small piece of tape or a plastic shield is still attached, the printer’s sensors will think the slot is empty.
The Long Tail Pull-Tab: Check for a long clear or colored plastic strip sticking out of the side of the cartridge. You need to pull this out completely until it detaches. This strip keeps the toner powder fresh inside, but if it's still there, no toner can reach the paper—and the printer might think the new cartridge is defective.
The Chip: Look for a small, flat metal chip on the cartridge. Ensure there isn't a thin piece of protective film covering it. If there is, peel it off gently!
Listen for the "Click": When you slide the toner cartridge into the machine, don’t be too timid. It should seat firmly with a clear "click." If it’s even a millimeter out of alignment, you’ll face the dreaded printer not recognizing cartridge error.
The Gentle Shake: Before installing, give the cartridge a gentle side-to-side shake (about 5 or 6 times). This redistributes the powder inside. Sometimes, settled toner can trick internal sensors into thinking the unit is empty.
Step 2: Reset Printer Memory
The Hard Reset: While the printer is still turned on, pull the power cord directly out from the back of the printer. Now, walk away for about 60 seconds. This allows the internal capacitors to fully discharge, wiping out that "empty" error message. Plug it back in, turn it on, and let it go through its startup cycle.
Clear the Printing Waiting List: Sometimes the problem isn't the printer; it’s your computer. If you have five documents stuck in line waiting to print, the computer might be sending the "No Toner" error back and forth in a loop. You need to reset printer queue by going to your computer's "Printers & Scanners" settings, opening the queue, and canceling all pending documents.
The "Try Again" Method: After you reset printer settings, try taking the new cartridge out and putting it back in one more time while the printer is powered on. This forces the sensors to perform a fresh scan of the hardware.

Step 3: The Chip Connection & Cleaning
Use The Eraser: One of the most effective ways to clean the chip on a new cartridge is actually using a common pencil eraser. Gently rub the eraser over the gold or copper contacts on the chip to remove any invisible film or static buildup. Just be sure to blow away any eraser crumbs before putting it back in!
The Lint-Free Wipe: If you don't have an eraser handy, use a dry, lint-free cloth. Avoid using tissues or paper towels, as they can leave behind tiny fibers that cause more trouble.
Check the Receiving Side: Don’t forget to look inside the printer itself. There are small metal pins or springs that press against the chip. Use a flashlight to see if any toner dust has settled on them. A quick puff of air or a gentle wipe with a dry swab can clear the path for a perfect connection.
When you’re dealing with a printer not recognizing cartridge error, the quality of the chip and the build of the unit make all the difference. This is where choosing a G&G compatible toner cartridge becomes your best defense against technical headaches. However, even the best tech needs a clean surface to work. By ensuring these contacts are spotless, you’re giving your printer every reason to say "Ready to Print."
Conclusion
Dealing with a printer not recognizing cartridge error can be a major speed bump in your workday, but as we’ve seen, the solution is usually just a few simple steps away. Whether it's a forgotten piece of shipping tape, a dusty chip, or a printer that just needs a quick reset printer cycle to clear its memory, you now have the tools to handle it like a pro.
Give your toner cartridge a quick check-up, clear that printer queue, and get back to what matters most—your work. Don't let a "Toner Empty" message slow you down.