If you’re staring at a page full of streaks or missing lines, don't panic—your printer isn't broken. There’s a simple, cost-effective way to revive a dry inkjet cartridge before you consider buying a replacement.
Is It Low Ink or a Physical Blockage?
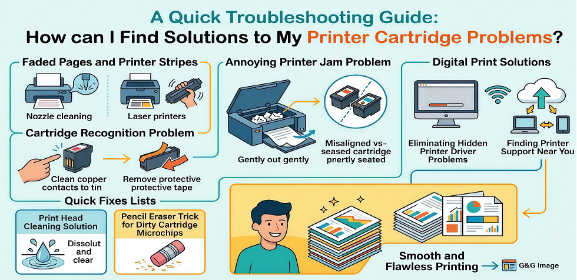
Before you start cleaning, you need to play detective to make sure you aren't just running on empty. A clogged printer cartridge and a low ink tank can look very similar, but there is one major difference: "The Fade" vs "The Streak."
Weight: If you are using G&G inkjet cartridges or other high-quality tanks, try taking the cartridge out and gently shaking it—if it feels heavy and you hear liquid moving, but nothing is hitting the paper, a clog is definitely your culprit.
Why Do Inkjet Nozzles Clog Anyway?
A dry inkjet cartridge usually happens because the liquid in the ink evaporates when the printer sits idle for too long, leaving behind tiny "scabs" of pigment that block the inkjet nozzle. Even high-performance inkjet cartridges can experience this if they aren't used at least once a week, especially in homes with low humidity or during the winter months when the heater is running.

Automatic Cleaning Before Manual Cleaning
Before you get your hands messy, let your printer try to fix itself. Every modern machine has a built-in "Self-Cleaning" or "Maintenance" mode designed specifically to clear a clogged printer cartridge by forcing a small burst of fresh ink through the nozzles to push out the blockage.
Step 1: Open your printer's "Properties" or "Preferences" menu on your computer (or look for the 'Maintenance' icon on your printer’s LCD screen).
Step 2: Select "Head Cleaning" or "Nozzle Check."
Step 3: Print a test page. If the lines are still broken, run it one more time.
Don’t do this more than three times in a row, as it uses up ink and can actually cause more heat-related clogs if the hardware gets too warm.
How to Clean your Inkjet Cartridge Manually
If the software cleaning didn’t do the trick, don't worry—it’s time to get a little "hands-on." To revive a stubborn clogged ink cartridge, you’ll want to mimic a professional deep-clean at home.
1. The Supplies: Grab a shallow bowl, some lint-free paper towels, and warm deionized or distilled water (tap water contains minerals that can leave deposits behind).
2. The Method: Fold a paper towel and place it in the bowl with just enough warm water to submerge it. Remove your clogged inkjet cartridge and sit it directly on the damp towel, inkjet nozzle side down.
3. The Wait: Let it sit for about 5 minutes. This "warm soak" gently melts the dried ink "scabs" that are blocking the flow.
4. The Test: Gently pat the nozzle dry with a fresh paper towel. If you see a clear, solid "stamp" of ink on the towel, the clog is gone! Reinsert it and run one final test print to see that professional quality return.
Recognizing Permanent Damage
If you have tried the warm soak twice and the print quality hasn't improved, the internal electronics or the delicate heating elements inside the nozzle may have failed.
At this point, forcing it can actually damage your printer’s carriage. Instead of wasting more time, it is smarter to recycle the old unit—many places allow you to sell inkjet cartridges for credit or rewards—and move on to an inkjet cartridge compatible with your specific model.
Choosing a fresh, high-yield G&G inkjet cartridge ensures you aren't fighting an uphill battle with worn-out hardware.
The secret to a stress-free printing experience isn't just about cleaning; it’s about prevention. To keep your inkjet nozzle from seizing up, make it a habit to print a "test page" or a small color photo at least once a week. This keeps the ink moving and prevents it from turning into a dry inkjet cartridge.
Additionally, consider where your printer lives—keep it away from direct sunlight or heat vents which can accelerate drying.